DHCP Relay
Tip
We strongly recommend you to setup DHCP relay and configure the hosts to obtain address via DHCP.
See Alternative: Configure static IP if you want to statically configure IP address on each host.
Overview
The DHCP relay app used in SD-Fabric is an L3 relay.
That is, it support relaying DHCP packets from/to a server that’s not in the same subnet of the client.
Here’s a list of features supported:
DHCPv4 and DHCPv6
DHCP server directly attached to fabric leaves, or indirectly connected via upstream router
DHCP client directly attached to fabric leaves, or indirectly connected via LDRA (Light-weight DHCP Relay Agent)
Multiple DHCP servers for HA
Note
Please pay attention to the definition of direct/indirect server/client. You will find them many times later in this section.
Configure DHCP Relay
Server directly connected to fabric

In this case, the configuration involves first configuring the switch interface with the VLAN/subnet the DHCP service is part of.
For example, if I have a switch of:205 with a DHCP server on port 24 on
VLAN 20, the port config looks like:
{
  "ports": {
    "of:0000000000000205/24" : {
      "interfaces" : [ {
        "name" : "dhcp-server-intf",
        "ips" : [ "10.0.2.254/24", "2001:db8:1::254/64" ],
        "vlan-tagged" : [ 20 ]
      } ]
    }
  }
}
A second part of the configuration for the DHCP relay app requires a json configuration under the key apps:
{
  "apps" : {
    "org.onosproject.dhcp-relay" : {
      "default" : [
        {
          "dhcpServerConnectPoint": "of:0000000000000205/24",
          "serverIps": ["10.0.2.253", "2001:db8:2::2"]
        }
      ]
    }
  }
}
Note that the dhcprelay app is configured with location of the DHCP server (the
switch port to which it is connected to the fabric).
It is also configured with the DHCP server IP, but it is no longer necessary to configure the MAC address of the server.
ONOS will automatically learn the MAC and VLAN corresponding to the serverIP.
Server reachable via external router
In this case, it is actually the external router that is directly connected to the fabric.
This external router is already configured in the ports section of network-config (for vRouter functionality).
For example, if the external router is connected to switch of:205 on port 1
{
  "ports": {
    "of:0000000000000205/1" : {
      "interfaces" : [ {
        "ips" : [ "192.168.101.2/30", "2000::c0a8:6402/120" ],
        "mac" : "a2:9b:32:9d:7f:b3",
        "name" : "internet-router"
      } ]
    }
  }
}
As before the ips and mac configured on port 1, actually correspond to
the addresses configured in Quagga.
The app config in this case, includes an additional field necessary to inform
the dhcprelay app of the gatewayIP through which the DHCP server can be
reached.
{
  "apps" : {
    "org.onosproject.dhcp-relay" : {
      "default" : [
        {
          "dhcpServerConnectPoint": "of:0000000000000205/1",
          "serverIps": ["10.0.2.253", "2001:db8:2::2"],
          "gatewayIps": ["192.168.101.1", "1000::100:1"]
        }
      ]
    }
  }
}
Note
Note that the dhcpserverConnectPoint should now be the switch port to
which the external router is connected to the fabric.
Setup DHCP server
Install DHCP server
Modern DHCP servers should support relayed DHCP request. However, the way to configure them are probably different case to case. Here we use isc-dhcp-server on Ubuntu as an example. To install the DHCP server, simply run:
$ sudo apt-get install isc-dhcp-server
Configure DHCP Server
Two configuration files are required by DHCP server.
First, we need to specify which network interface the DHCP server should listen on.
To do that, we need to modify /etc/default/isc-dhcp-server and change the following line.
INTERFACES="eth1"
Next, we need to specify the subnet we want to lease.
To do that, we need to modify /etc/dhcp/dhcpd.conf and add the following lines.
Note that the subnet of eth1 needs to be included.
Otherwise, the DHCP server will not listen to the interface even though we have
specified that in /etc/default/isc-dhcp-server.
subnet 10.0.1.0 netmask 255.255.255.0 {
  range 10.0.1.1 10.0.1.240;
  option routers 10.0.1.254;
}

# A subnet that matches the interface IP address is required by isc-dhcp-server
subnet 10.0.2.0 netmask 255.255.255.0 {
  range 10.0.2.1 10.0.2.240;
  option routers 10.0.2.254;
}
It’s similar to configure DHCPv6.
subnet6 2001:db8:1::/64 {
        # Range for clients
        range6 2001:db8:1::129 2001:db8:1::250;

        # Range for clients requesting a temporary address
        range6 2001:db8:1::/64 temporary;
}
# A subnet that matches the interface IP address is required by isc-dhcp-server
subnet6 2001:db8:2::/64 {
        # Range for clients
        range6 2001:db8:2::129 2001:db8:2::254;

        # Range for clients requesting a temporary address
        range6 2001:db8:2::/64 temporary;

        # Prefix range for delegation to sub-routers
        prefix6 2001:db8:1:: 2001:db8:10:: /56;

}
Finally, restart the DHCP server.
$ sudo service isc-dhcp-server restart
Testing
The host should be able to obtain an IP address from the pool we specified.
Try to run dhclient and see if the host can get an IP address.
sudo dhclient eth1
It’s similar to test DHCPv6
sudo dhclient -6 -N eth1       # for obtaining ip address
sudo dhclient -6 -P -N eth1   # for obtaining ip address and prefix together

sudo dhclient -6 -r eth1       # for releasing ip address
sudo dhclient -6 -P -r eth1   # for releasing prefix
If something goes wrong, check /var/log/syslog for DHCP server log and run
tcpdump on DHCP server to see if the DHCP packets from the host reach the
server correctly.
Additional Features
DHCP Relay store
DHCP relay application stores information from DHCP packet which processed by
the app, administrator can use CLI command dhcp-relay to query these
information.
The store provides these functionality:
Latest state of DHCP client (e.g. client location, last seen time, DHCP type…), for debugging purpose
For direct host, ONOS can find location and VLAN from relay agent option, however, for indirect host, ONOS need to query last state from the store to find correct destination.
DHCPv6 Relay counter
There are two DHCPv6 packet counters which are Host basis counters and Global counters.
Host basis counters count and record DHCPv6 packets received on this host.
It can be displayed by dhcp-relay counter. These counters can be reset by
typing dhcp-relay counter reset.
onos> dhcp-relay counter
DHCP Relay Counters :
Counters for id=00:AA:BB:00:00:01/None, locations=[of:0000000000000204/3]
SOLICIT                         ............................  4    packets
REQUEST                         ............................  4    packets
ADVERTISE                       ............................  4    packets
RENEW                           ............................  1000 packets
REPLY                           ............................  1004 packets
Counters for id=00:AA:00:00:00:01/None, locations=[of:0000000000000205/3][D]
SOLICIT                         ............................  2    packets
REQUEST                         ............................  2    packets
ADVERTISE                       ............................  2    packets
RENEW                           ............................  500  packets
CONFIRM                         ............................  2    packets
REPLY                           ............................  500  packets

onos> dhcp-relay counter reset
Global counters counts and records all DHCPv6 packets received in ONOS.
It can be displayed by dhcp-relay-agg-counters. These counters can be reset
by typing dhcp-relay-agg-counters reset.
onos> dhcp-relay-agg-counters
DHCP Relay Aggregate Counters :
SOLICIT                         ............................  12   packets
REQUEST                         ............................  12   packets
ADVERTISE                       ............................  12   packets
REBIND                          ............................  4    packets
RENEW                           ............................  3026 packets
CONFIRM                         ............................  4    packets
REPLY                           ............................  3044 packets

onos> dhcp-relay-agg-counters reset
Indirect client support
DHCP relay can support hosts which do not directly connect to SD-Fabric.
These hosts usually connected to another LDRA, the LDRA will forward DHCP packet to/from SD-Fabric.
For DHCPv4, packets from the LDRA includes a valid DHCP relay agent option (option 82).
DHCP Relay application checks relay agent option and determine the DHCP packet comes from direct or indirect host.
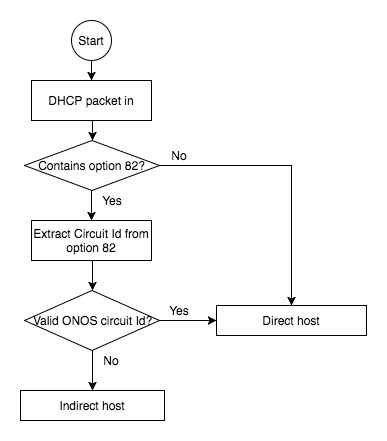
ONOS uses circuit id option in relay agent option with specific format if DHCP
packet comes without relay agent option, the format of circuit will be:
ConnectPoint:VlanId
For example, the DHCP request/discover packet comes from
of:000000000000001/1 with VLAN 100, the circuit ONOS put will be
of:000000000000001/1:100 and send DHCP packet to DHCP server.
Indirect host won’t put into host store. DHCP relay app will put IP address of indirect host to the route store, and use IP address of relay agent as next hop.
DHCPv6 clients will be handled similar to DHCPv4.
One major difference is that DHCPv6 supports RELAY-FORWARD message type and
InterfaceId option natively, so we utilize those fields to encode
information.
Overwrite relay agent IP
The DHCP relay can overwrite the relay agent address (giaddr in DHCPv4,
link-addr in DHCPv6) in DHCP message for different device.
If relayAgentIps is configured, the app will overwrite giaddr or
link-addr before it forward the DHCP message to the server.
Otherwise, it will retain the original relay agent IP.
An example configuration is shown below:
{
  "apps" : {
    "org.onosproject.dhcprelay" : {
      "default": [{
        "dhcpServerConnectPoint": "of:0000000000000002/2",
        "serverIps": ["172.168.10.2", "2000::200:1"],
        "gatewayIps": ["192.168.10.254", "1000::100:1"],
        "relayAgentIps": {
          "of:0000000000000001": {
            "ipv4": "10.0.0.10",
            "ipv6": "2000::10"
          },
          "of:0000000000000002": {
            "ipv4": "10.0.1.10",
            "ipv6": "2000::1:10"
          }
        }
       }]
    }
  }
}
Configure multiple servers
DHCP server HA can be achieved by specifying additional server configuration objects.
Client initiated packets like SOLICIT or REBIND shall be replicated and
sent to all server objects.
Below is an example of multiple server configuration:
{
   "apps" : {
       "org.onosproject.dhcprelay" : {
           "default": [
               {
                   "dhcpServerConnectPoint": "of:0000000000000205/5",
                   "serverIps": ["10.0.3.252", "2002:4::253"],
                   "gatewayIps": ["10.0.3.100","2001:3::100"],
                   "relayAgentIps": {
                       "of:0000000000000204": {
                           "ipv4": "10.0.2.254",
                           "ipv6": "2001:2::254"
                       }
                   }
               },
               {
                   "dhcpServerConnectPoint": "of:0000000000000206/3",
                   "serverIps": ["2002:5::253"],
                   "gatewayIps": ["2001:4::100"],
                   "relayAgentIps": {
                       "of:0000000000000204": {
                           "ipv4": "10.0.2.254",
                           "ipv6": "2001:2::254"
                       }
                   }
                }
            ],
            "indirect": [
                {
                    "dhcpServerConnectPoint": "of:0000000000000205/5",
                    "serverIps": ["10.0.3.252", "2002:4::253"],
                    "gatewayIps": ["10.0.3.100", "2001:3::100"],
                    "relayAgentIps": {
                        "of:0000000000000204": {
                            "ipv4": "10.0.2.254",
                            "ipv6": "2001:2::254"
                        }
                    }
                },
                {
                    "dhcpServerConnectPoint": "of:0000000000000205/5",
                    "serverIps": ["10.0.3.252", "2002:5::253"],
                    "gatewayIps": ["10.0.3.100", "2001:3::100"],
                    "relayAgentIps": {
                        "of:0000000000000204": {
                            "ipv4": "10.0.2.254",
                            "ipv6": "2001:2::254"
                        }
                    }
                },
                {
                    "dhcpServerConnectPoint": "of:0000000000000206/3",
                    "serverIps": ["2002:5::253"],
                    "gatewayIps": ["2001:4::100"],
                    "relayAgentIps": {
                        "of:0000000000000204": {
                            "ipv4": "10.0.2.254",
                            "ipv6": "2001:2::254"
                        }
                    }
                },
                {
                    "dhcpServerConnectPoint": "of:0000000000000206/3",
                    "serverIps": ["2002:4::253"],
                    "gatewayIps": ["2001:4::100"],
                    "relayAgentIps": {
                        "of:0000000000000204": {
                            "ipv4": "10.0.2.254",
                            "ipv6": "2001:2::254"
                        }
                    }
                }
            ]
        }
    }
}
dhcpServerConnectPoint: represent the location of DHCP serverserverIps: IP address of the DHCP server, contains at least one IP address of DHCP server. IP address can be IPv4 or IPv6 for different version of DHCP. Will use first address if multiple IPv4 or IPv6 address configured.gatewayIps: Optional. Should be configured if the DHCP server is not directly connected to the SD-Fabric. It tells which gateway we need to send to reach the server.
Note
If
indirectserver configuration is not configured, the app will usedefaultconfiguration for all cases.
Ignoring DHCP relay on a particular VLAN
In some cases, it may be necessary to avoid punting DHCP packets to the controller, and letting them be forwarded normally through the data plane.
In such cases, the DHCP relay application can be configured to avoid punting DHCP packets on a particular VLAN on a particular switch.
{
  "apps" : {
    "org.onosproject.dhcprelay" : {
      "ignoreDhcp" : [
        { "deviceId": "of:0000000000000205", "vlan":24 },
        { "deviceId": "of:0000000000000206", "vlan":24 }
      ]
    }
  }
}
In the example shown above, DHCP packets on VLAAN 24 are not punted to the controller from switches of:205 and of:206
DHCPv6 Prefix Delegation (PD) Pushing
Note
This feature requires both dhcprelay and fpm apps to be activated
PD pushing allows IPv6 prefixes from DhcpRelay to be sent over the FPM connection to Quagga where they will be configured as a static route.
Prior to PD Pushing, the FPM connection was only used by Quagga in one direction to push routes to FPM. PD pushing is disabled by default in DHCP Relay and FPM.
To enable in DHCP relay:
onos> cfg set org.onosproject.dhcprelay.DhcpRelayManager DhcpFpmEnabled true
To display PD’s stored in DHCP relay, execute the following CLI command:
onos> dhcp-fpm-routes
When PD pushing is enabled in FPM, by default the next-hop to be used for all
prefixes pushed to Quagga will be retrieved from the first interface with
RUR in the name in ONOS.
Next-hop may also be configured using FPM component config. This will override
a RUR interface if present.
If there is no interface with RUR in the name and the next-hop is not
configured, no prefixes can be pushed to Quagga even if PD pushing is enabled.
For DhcpRelay, only the IPv6 next-hop is needed.
To enable in FPM:
onos> cfg set org.onosproject.routing.fpm.FpmManager pdPushNextHopIPv4 124.200.1.60
onos> cfg set org.onosproject.routing.fpm.FpmManager pdPushNextHopIPv6 2001:a08::2
onos> cfg set org.onosproject.routing.fpm.FpmManager pdPushEnabled true
To verify that PD pushing is enabled:
onos> fpm-connections
PD Pushing is enabled.
peer 124.200.3.42:48640 connected to 127.0.0.1 since 2m23s ago * (2 routes locally)
Prefixes pushed to Quagga can be displayed in vtysh using show ip route and show ipv6 route.
If the output is not as expected, check the Quagga log to see if it was received from FPM.
Note
Quagga requires a patch to be able to receive Netlink Messages from FPM.
Clean up expired address and PD prefix
DHCPv6 relay cleans up stale IP address and pd prefix based on timer whose default interval is 24 hours (24 * 3600 secs = 86400 secs).
If the preferred life time of ip address or pd prefix exceeds 1/2 of poll interval, they will be removed from ONOS.
The poll interval can be modified by cfg set
org.onosproject.dhcprelay.DhcpRelayManager dhcpPollInterval <newVal>
onos> cfg get  org.onosproject.dhcprelay.DhcpRelayManager
org.onosproject.dhcprelay.DhcpRelayManager
    name=dhcpPollInterval, type=integer, value=86400, defaultValue=86400, description=dhcp relay poll interval

onos> cfg set org.onosproject.dhcprelay.DhcpRelayManager dhcpPollInterval 60

onos> cfg get  org.onosproject.dhcprelay.DhcpRelayManager
org.onosproject.dhcprelay.DhcpRelayManager
    name=dhcpPollInterval, type=integer, value=60, defaultValue=86400, description=dhcp relay poll interval
Alternative: Configure static IP
Although we strongly recommend to use DHCP Relay for IP assignment, it is also possible to statically configure the IP address and route on the host.
Configure the IP address and subnet mask
Make sure the IP address and the subnet mask on the fabric network interface of the host is consistent with the information in the Network Configuration section. For example, you can run
# ip addr add 10.0.0.1/24 dev mlx0
Configure the default route
Make sure you change the default route of the host to the interface IP of the leaf switch it connects to. For example, you can run
# ip route add default via 10.0.0.254
Note
In the case that you want to keep default route through the management network, you need to add routes to all other subnets in the network one by one.
Trigger host learning
We need to let ONOS learn the host in order to program corresponding flows and groups.
This is automatically done as part of the DHCP process.
However, we need to manually triggers it by sending an ARP or ND packet if the host is configured to use static IP.
# arping -c 1 ${GATEWAY_IP}
# ndsend ${HOST_IP} ${INTF}